A 3 Item "To Do" List

I’ve posted before about my “To Do” Lists. Now that we have a new baby in our house, my “To Do” list has needed some adjusting.

Currently I’m operating on the “3 Item To Do List” method (inspired by Simple Mom, of course). Before I go to bed (usually while I’m nursing the previously mentioned sweet baby) I think about the 3 most important things I need to do the next day. 3 things a day is a realistic expectation for myself, with my 3 young children. This week my list included things like: laundry, call about adding the baby to health insurance, do a Nurture Mama blog post, finish the Primary newsletter, get groceries, return library books, etc.

I write down my 3 items and then do my best to focus on those tasks first whenever I have a spare moment throughout the day. I’ve been keeping my list in a prominent place on my fridge so it’s easy to see what I should be working on.

Some days I don’t quite make it through all 3 items. On those days, rather than becoming discouraged, I stop and reflect and remind myself that in reality I did a lot more than 3 things: I did cook dinner for my family, and I did do the dishes, and I did spend 2 hours at the park with my children, and I did read my scriptures, and I did nurse my baby x number of times and change x number of diapers, and I did tell my family that I love them. That’s really what’s most important, isn’t it?

If you need some ideas for organizing yourself and your time a little better, be sure to check out the Home Management Notebook series on Simple Mom. Tsh has fabulous ideas and resources available to help you be more organized and more effective in your home.

Prepared Mama: Ready for Illness

Has this flu season got you worried? It seems like something flu related is always in the news, with a lot of dire reports. I have decided not to stress myself out worrying whether we are going to get sick or not, and am just doing my best to be prepared in the event that we do get sick. In the last 6 weeks or so everyone in my family has been sick with something. Nothing terribly serious (mostly coughs and runny noses and some fevers and ear infections), but it’s been enough that I am ready for everyone to just be healthy.

So…this is what we’re doing to be more proactive about our health.

We had a Family Home Evening lesson on staying healthy, including lessons in hand washing and how to properly blow your nose with a tissue. (You can view my staying healthy lesson here.)

We wash our hands a lot and keep the hand sanitizer handy.

We checked our cupboard and stocked up on essential medicines and supplies so we don’t have to make a midnight or Sunday run to the pharmacy in an emergency. Items like children’s ibuprofen and Tylenol (and some for the adults), extra diapers and wipes, Lysol cleaning wipes, etc. Ready Set Plan has a great list to give you ideas of what you might want to store.

We’re working on getting our flu shots (but we keep getting thwarted by a child is already sick and therefore shouldn’t be vaccinated whenever we have an appointment). We’ll keep trying!

I’m educating myself about the flu and related illnesses. Here are some helpful articles/sites that I have come across:

Centers for Disease Control and Prevention: H1N1 General Information

American Academy of Pediatrics: H1N1 Flu Information
The Mayo Clinic: Hand Washing
Web MD: 12 Tips to Prevent a Cold
Questions and Answers about the Flu on Teach Mama
A story of a real family’s experience with swine flu on Prepared LDS Family

I hope your family and mine can be healthy this season!

“Un”Prepared Mama: 72 hr Kits
Remember the posts about 72 hr kits I wrote last July? This one and this one and this one?

Well. Today I pulled out our food packs to check the expiration dates on the food items and see if anything needed to be replaced. I had planned to do this General Conference weekend, so I’m only a month behind schedule. As I started pulling out the food I discovered that all of the fruit cups, pop tarts, and peanut butter crackers are expiring either this month or next. That is a good portion of our food packs, and to me that is an unacceptable amount of food to have to replace in 4 or 5 months. That is just way too much effort.

So I’m going to have to rethink our food-pack menus and figure out something that is little longer lasting. I would love to hear your suggestions!

Prepared Mama: 72-hr Emergency Kits for Kids

This week I finished assembling 72-hr emergency kits for my two children. I have to admit, their kits are pretty minimalist.
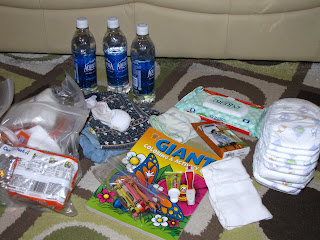
This is what I included:
• 3 day supply of food
• 3 water bottles
• Wash cloth
• Travel size toothpaste and toothbrush
• Wipes and diapers (Sweet Bee only)
• Complete change of clothing
• Emergency blanket
• Family phone numbers
• Coloring book, crayons
• Softie (a special snugly item for the Sweet Bee)
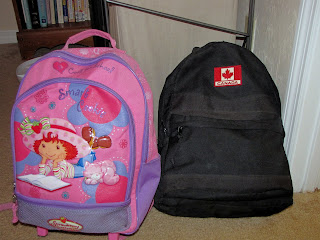
I just used backpacks that I already had around the house. The Ant Bug’s bag has wheels. It’s too heavy for her to carry on her back, but she can use the handle and pull it.

This is the first time I have actually packed kits for children, so I decided to ask my more experienced extended family members for their ideas. Below are some of their very helpful suggestions.

Eliza’s General Tips: I put things into the backpacks (72-hour kits) that I would need for my children for three days. So we start with diapers and wipes and plastic bags for garbage, and then food and basic cleaning supplies. I also have some diaper pins and cloth diapers in case we run out of the disposable diapers. Last year I made a small comfort blanket for each child (piece of fleece with a ribbon sewed around the edge) that is also stored in the 72-hour kit. I made each one in their favorite color. I don’t put some of the first aid things in their backpacks, but I do have some family items scattered among all the backpacks. So, for example, one child might have more food than the others since Kirk’s bag has the water purifier in it.

Katie’s General Tips: I don’t have everything packed and ready yet, but Kyle has a much larger pack than the rest of us. I only packed clothes and food in Kayla’s bag which we could be carrying in our hands anyway. The older kids have all the basics except first aid stuff. Kyle has all that plus things like t.p. and water filter and gas stove, mess kit, etc. I’ve also included little activities for the kids such as coloring books or other books and playing cards. I’ve had to update Kayla’s bag every few months as she grows out of things. I do that when I rotate her other clothes into storage.

Tiffany on Clothing: The clothing idea that I like is to have sweat suits for each person. In time of emergency–if it is summer than you can cut off the sleeves and shorten the pants, or if it is cold then you have warmer clothing. This supposedly solves the problem of having to rotate the clothing seasonally. (If you live in the desert you may or may not want to use this idea!) Of course, for growing kids the only way to make it work size-wise is to stay on top of rotating clothing. Easier said than done! But, I guess you could buy clearance or second-hand sweat pants/shirts–one in each size all the way up the size chart and just devote them to the 72-hour-kit cause.

Becky on Transportation: We got a nice wagon to help carry the load- we also have a bike trailer that could be used to transport children and backpacks. Our neighborhood has emergency drills about twice a year and it has been interesting to actually strap the backpacks on everyone and see how they do for a short walk. Paul and I have backpacking packs so that we can carry most of the items- the children can’t really carry that much so we just keep their packs pretty light.

Tiffany on Transportation: My latest answer to the question of “how can the kids haul their kits?” was to buy a few of the rolling backpacks. That would make it easy for adults as well as children.

Tiffany on Food: My latest idea is to get a large see-through plastic storage bin to put in my pantry. I will then stock it with all the food for the 72-hour-kits and date the items. Then–the food should be easily at hand and visible so I can rotate it more readily! So, if we have an emergency at home we’ll have the food and be fine. If we have to leave in a car then it will be easy to grab the backpack kits and the food box. If we need to we can easily distribute it into the individual kits. So, this isn’t something I’ve done–it just seems to be my latest idea of something that might work for me.

I think the key is to just start doing something. I don’t feel that our kits are exactly perfect yet, but I can keep adjusting things as we go along. At least we’re a lot better off then we were just a few months ago!

Helpful Resources
Prepared LDS Family: This site is amazing and very helpful! Read it, and you’ll be inspired to do something to prepare your family!
If ye are prepared ye shall not fear: This thought-provoking site explores issues of preparedness for the coming hard times.
Team Freeman: Project Prepared Part 3: A real-life example of a 72-hr kit.
Ready.gov: Prepare. Plan. Stay Informed.

Prepared Mama: Personal Supplies for a 72-hr Kit

Next up on my Preparedness Project List was to make sure all of our personal supplies were up to date. Luckily most of these supplies were already gathered from my last push for preparedness a few years ago so I didn’t have to do too much this round.
This is what I included in my kit:

A list of items in kit

Personal Hygiene Items

• Bar of soap, wash cloth, hand towel
• Travel size deodorant
• Hair elastics
• Travel size toothpaste and toothbrush
• Kleenex
• Insect repellent
• Cotton balls, Q-tips
• Toilet paper, wet wipes, hand sanitizer
• Feminine supplies
• Complete change of clothing (not shoes)

Tools, First Aid, Etc.
• Flashlight w/ batteries, matches, lighter, candle
• Emergency blanket
• Paper and pen
• 1 Garbage bag
• Mini First aid kit
• Rain poncho
• Whistle
• Family phone numbers
• Book of Mormon, small ball, deck of cards
• $41 cash

My husband’s kit includes the same items, customized for a man. To keep things organized I packed like items in smaller Ziploc bags.

I realize this list of supplies is a little on the lean side. But I’m starting with the basics! Prepared LDS Family has a great list of supplies to include that is a little more thorough. Definitely go read her list.

Here are the loaded backpacks for myself and my husband. (Guess which is which!)
I picked up the backpacks on clearance a few years ago after the back to school rush, so now might be a good time to be working on this project. These backpacks also include our 3-day supply of food I described in detail here.

My next Preparedness Project will be to finish packing kits for my two children. I’ve been surveying experienced family members on tips for packing kits for young children, but I’ll leave that for another post.

I’m beginning to feel like I’ve only just skimmed the surface when it comes to preparing my family for an emergency. 72-hr kits, emergency supplies, disaster plans, copies of important documents, car kits, food storage…the list goes on and on. But I’ll keep working away at it–baby steps are better then no steps!

“…if ye are prepared ye shall not fear”
D&C 38:30

Helpful Resources
Prepared LDS Family: This site is amazing and very helpful! Read it, and you’ll be inspired to do something to prepare your family!
If ye are prepared ye shall not fear: This thought-provoking site explores issues of preparedness for the coming hard times.
Team Freeman: Project Prepared Part 3: A real-life example of a 72-hr kit.
Ready.gov: Prepare. Plan. Stay Informed.

Prepared Mama: Food Packs for 72-hr Kits

A few weeks ago for Family Home Evening we pulled out our 72-hr emergency kits. I was a little chagrined by what I found. Our packs had been last updated in November of 2006. That means our food was two and half years old–yuck! And we only had two kits–for our family of four. Not so good.

So we got to work.

We thought it important to focus first on our food packs. I pulled out my sizable file of preparedness information I’ve collected over the years and did some research. These two blog posts were also very helpful:
Prepared LDS Family: 72-hr kits food packs
Team Freeman: Project Prepared Part 3

Keeping their suggestions in mind I made my shopping list. I did some price comparisons and ended up doing most of my shopping at Sam’s Club, picking up a few things that were on sale at my local grocery store.

This is what we came up with for a one day menu.

Kellogg’s Pop tarts (twin) 4 oz.,
Chef Boyardee Ravioli, or other 7.5 oz.,
Maruchan Ramen Noodle Soup, 3 oz.,
2 MM Fruit Snacks 1.8 oz.
Del Monte Fruit cup 4 oz. can,.
2 Quaker Granola bar .84 oz,
2 Peanut Butter crackers, 1 oz.
Plastic spoon
Gallon size Ziploc bag
napkin

*Note: This is the amount for one day. It doesn’t look like much. Some sites recommend more food than this, but this is what we are comfortable with right now, keeping in mind portability and our budget. I would like to add some PowerBar Protein bars soon but I’m waiting for a good deal to buy them. The gallon size Ziploc bag serves as the holding container for each day’s contents.

To keep things simple I kept the same menu for each day, for each member of our family. So multiply the above list by 3 and you’ll have enough for one person’s 72 hr (3-day) pack.

We then spent another Family Home Evening assembling the packs for our entire family. The 4-year old Ant Bug was very excited about helping with this activity, but the 20-month old Sweet Bee mostly just wanted to eat the fruit snacks.

The first step is to label each Ziploc bag. I used sticky labels and wrote “Day One-K”, “Day Two-K” and “Day Three-K”, repeating this with their initials for each member of my family. Using the Ziploc bag helps keep things organized; it’s waterproof and it can also double as a trash bag.

Here is our food pile.

With all of our food gathered we then went around the table and filled up our bags.

A finished bag.

Water
Not included in the above menu is water. The recommendation is that you have 1 gallon of water per person per day. Obviously we can’t carry that in our packs, so I just stuck 3-16.9 fl oz water bottles in each pack.

The Plan
I don’t want to end up with two year old fruit cups and granola bars in our kits again. So our plan is to pull out our kits every six months and change out the food that is nearing expiration. The easiest way to remember to do this is to coincide it with General Conference sessions. It happens twice a year and you won’t forget it! I’ve heard of this idea from many sources, so come October I’ll be pulling out our kits again.

My next step is to finish putting together the personal supplies for our kits. How are you doing when it comes to emergency preparedness? Please leave a comment with your tips!

Helpful Resources
Prepared LDS Family: This site is amazing and very helpful! Read it, and you’ll be inspired to do something to prepare your family!
If ye are prepared ye shall not fear: This thought-provoking site explores issues of preparedness for the coming hard times.
Team Freeman: Project Prepared Part 3: A real-life example of a 72-hr kit.
Ready.gov: Prepare. Plan. Stay Informed.